This actually super easy and super helpful. Open VS Code and copy paste the code there and from there copy the code to one note.
Saturday, 22 August 2020
Syntax Highlighting in Onenote Without Extension
Saturday, 5 October 2019
Using Adal JS to Achieve Single Signon with Dynamics
Recently I was looking at using App registrations with Dynamics 365. I realized that there are not many examples or tutorials that explain how to create a third-party application that connects to Dynamics 365 via an App registration.
Web API was introduced in Dynamics 365 back in 2015 when it is still called CRM. It meant any front-end developer can get access to this outstanding feature of the platform available via the API. If you are a front-end developer and creating functionality with Dynamics 365 in form JS or maybe a custom html web resource, then using pure JavaScript can serve your purpose; what happens if your core capability sits outside of a pure JS .NET stack? Can you create code in React that can communicate with Dynamics 365? Of course, you can! If not, then tutorial can help you out.
Basic Understanding
Every third-party application that connects to Dynamics 365 serves a different purpose. It matters to Dynamics 365 on how much ‘trust’ it can have on your application. There are two very high level concepts here:
- You log in to your application and then on a different tab when you access Dynamics 365 you do not see any log in screen or vice versa - your application and Dynamics 365 trust each other! They trust each other so much that they allow log in session to be carried over from one application to another. This is called implicit log in or single sign on (SSO).
- In your application you can only perform certain functionality in Dynamics 365 (or CDS). Both Dynamics 365 and your application should generally have individual log ins but when you perform certain ‘agreed’ functionality you do not get presented with an intermediate log in screen. It means Dynamics 365/CDS gives your application ‘specific sets’ of permission to perform this operation and only this operation. You may have rightly guessed, this is called explicit log in.
In this tutorial I am going to show how you can build an application with React that can perform implicit log in with Dynamics 365. A similar sort of work is done by Microsoft with pure JS and HTML5. Details of the step can be found in this Microsoft document.
TL:DR
So, here’s what I want to do - create an application that when you start it, you are presented with a global Microsoft log in page. On providing your Dynamics 365 credentials you will be authenticated, and the application will query your Dynamics 365 Account records and display them back to you.
Once logged in to your application you can open the Dynamics 365 UI in another browser tab - you should notice that you are not presented with a log in screen. This will be because your organization’s Active Directory is honoring the log in that you made to your application. I have achieved everything by using Dynamics 365 trial edition and the Azure environment that ships with it. If your organization has hosted Azure, then there can be some extra layer of security associated with it.
Key Components
App Registration
I have already hinted that I am going to use app registration. App registration is exactly what it says on the tin. It is a registration for your app so that it can be trusted by the azure. There is quick start guide available in this MS doc but since I am using a trial dynamic 365 I am going to achieve the same thing slightly differently.
Adal JS
Adal js encapsulates inner workings of a CORS call to authenticate a user with active directory. This MS Doc has very nice definition of adal js. In this example I am using React as my core framework. Adal js has a npm distribution which can be consumed by React application. Npm package in question along with some introductory code can be found here. The most information about adal js is actually hosted in their github repository.
Access Token
In common terms, access token is a BASE64 encoded string which needs to accompany every Api request that you make to any application hosted on or signed by Microsoft. It is something that identifies you as yourself to Microsoft Identify server. This MS Doc gives you elaborate details of what is an access token.
Hands On
With all the definitions and discussion on the key components being done, I think we are now ready to start our tutorial. Here’s what we are going to do today,
Step 1 : Create an application user that ties that application registration into a system user account.
Step 2 : With the help of adal js authenticate a user and bring all those Dynamics 365 goodies into your application.
You might have noticed that I have left out the part where you create a Dynamics 365 trial instance. It is a prerequisite of our tutorial below. Setting up a trial instance of Dynamics 365 is really easy and hence is out of the scope of this discussion. There are plenty of links available online.
Step 1 : Application Registration and User set up
Application Registration
As I mentioned before setting up application registration for a Dynamics 365 trial is slightly different than a dedicated tenant. The core concepts although are the same. So let’s start,
- Log in to your trial Dynamics 365 instance. From there click on the setting menu on the top right corner and select Admin

- On the next screen click on Azure Active Directory. You should be redirected to azure portal.
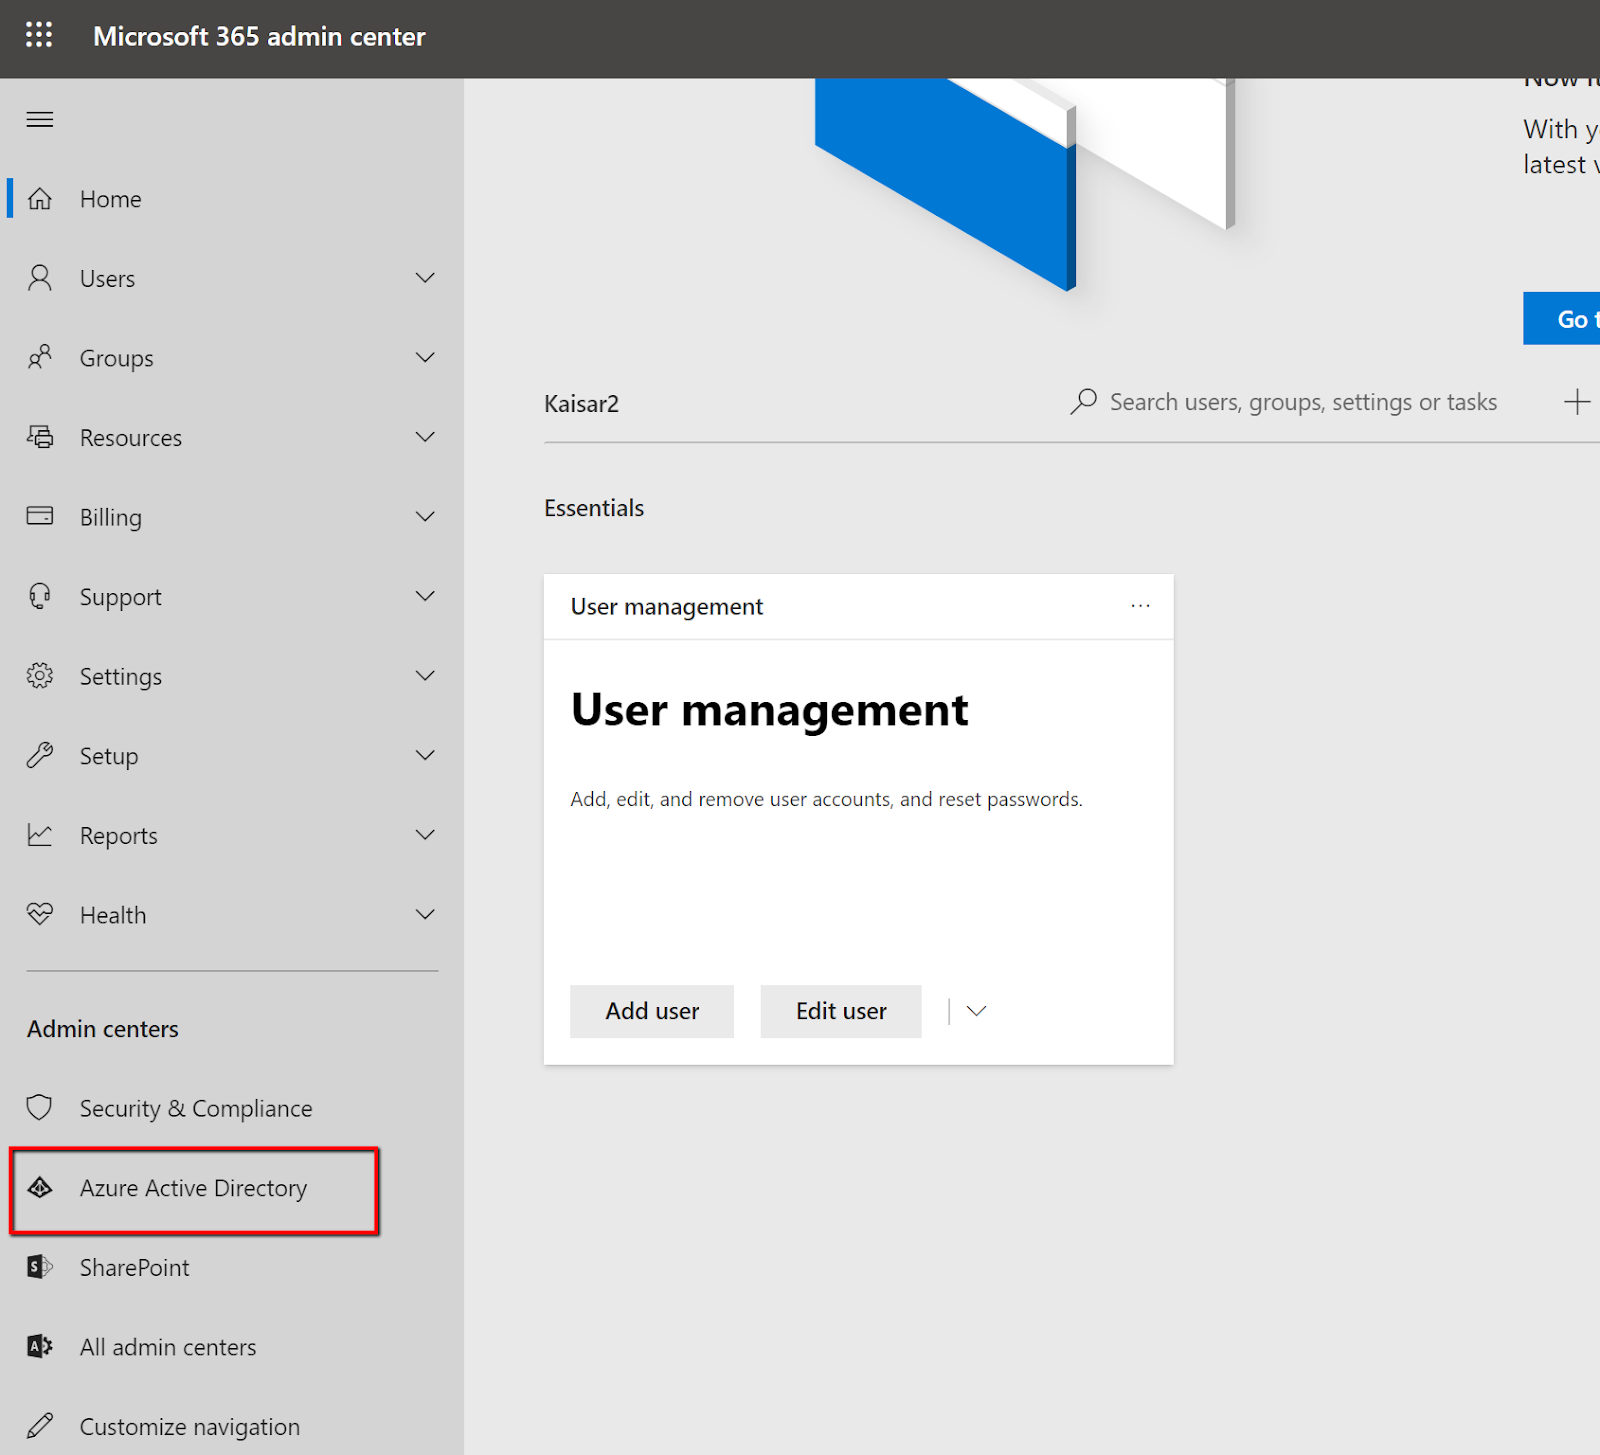
- Once there, click on Azure Active Directory again

- Once in the Active Directory click on the App Registrations button. When the screen loads it will show you all the application registration you have for this Azure Active Directory. Click on New registration.
- When the screen loads you will be presented with three options,
- Name : You can choose any but the recommendation will be to choose something meaningful
- Supported Account Types: There are three options here. As we know our application will always be used under the context of a Dynamics 365, so I have selected option 1 – Accounts in the organizational directory.
- Redirect URI : Although this is option when creating an app registration however it is most crucial part of setting any app registration before starting to use it. This basically asks what to do when the users have successfully logged into your application. As mentioned, before I am using React and React’s default dev server runs under http://localhost:3000. So I have set the redirect uri as so that it can be run from my machine. So when the app is live this uri will then need to be changed. For implicit sign on the it needs to be selected as web.
It is very crucial to get the redirect uri correct. If your uri is not correct, for instance, your dev server is actually having https not http, then it wont work. After each successful log in you will be again presented with the same log in screen that you passed moments before.
After the set up you can find the app registration following the same first few steps discussed above.

Post Registrations Step
Clicking on the app registration will take you to the home page of the app registration. From that page copy the Application (client) Id Guid. You will need that for setting application in Dynamics 365.

While you are on the application user blade, click on authentication and make sure the following is correct,
- Redirect Uri has at least one item registered, and this item is a Web and a Uri is correctly set up.
- Under the implicit grant ID Token is selected.
- On Supported account type, Account in this organizational directory only is selected. I have not tried with other option since I am using a trial Dynamics 365. Therefore, I am not sure if this step is optional.
There is something I always forget and that is grant access to my app registration to my Dynamics 365 application. Go to Api Permission blade and click Add Perminssion. Select Dynamics 365 from the list and click on user_impersonation and then click on Add Permission at the bottom of the page.
You will then be taken to the previous blade where now you could see the permission you have just added. Click on Grant Admin Consent for <your org name>. After the consent it should look like below,

Application User in Dynamics 365
Setting up an application user is the same as before from back in the day when you could set up a user directly from CRM. This is done by going to
Settings > Security > Users
Once there select Application Users view to unlock the new button. Once the view is refreshed you can click New button and a new user screen should appear. One thing I myself always tend to forget is changing the default view of the form to Application User. In all the other views the fields are disabled. We copied the client id from the previous step, and we will be using it here. So, here’s my application user in Dynamics 365 look like,

Once the user is added it can be treated as a normal user. For this reason, you need to add necessary roles to it as well.
Step 2 – Creating a React application and using the app registration
This portion of the tutorial is focused on React. For this reason, you need to have React installed in your development machine with all its dependency. Once you installed React you are ready to go. In order save the readers from my lousy design skills I am using bootstrap and I have added it as a dependency on my application.
I have already mentioned, the application that I am building will prompt the user to log in to the application by using the same credentials that they use for Dynamics 365. Once logged to just to show the trust between Dynamics 365 and application is established, I am showing a list accounts where the description fields is not empty. So let’s start!
After creating my React app and installing bootstrap I need to install package for Adal through npm. The package is called React Adal and can be found here. It also describes some configuration to get started and I followed this to the letter as well.
My index.js and indexApp.js look like below
All my Adal configuration is located in the AdalConfig.js. Again, there is nothing super crafty about it,
One thing worth disucssing from above is the Api valie. This is where I found myself wasting so much of my time. Endpoints.Api url is against what I am validating application against. I could not find a proper definition of it online. This is my way of defining the setting. I would welcome any other, more valid definition from anyone else. So definition as it currently stands is this,
If you ask Azure, hey azure, can you validate my permission of access to this Api of yours. What ever this is, is what the you’d put under endpoints.api setting.
With that out of the way here is my AdalContext.js
Once this is out of the way the rest if very easy,
And that’s it. I hope I have explained the problem and
solution as elaborately as possible. Like always the code is available on my Github repo
for you. Although it’s been there as ‘as is’ in a non-production ready state, I
would love hear your opinion and if you can see anything that is fundamentally
flawed.
Sunday, 8 September 2019
Virtual Entity : Chapter 4 – Pulling API Endpoint Settings from Data Source Entity
Overview
This is of the four-part series tutorial where I am trying
to explain virtual entity in Dynamics 365 CE. The chapters are,
- Chapter 1 - Core concept and definition
- Chapter 2 - Setting up custom data source and custom provider and hands on code
- Chapter 3 – Introducing searching capability
- Chapter 4 – Storing the settings for the api. (Current)
The demo is created on a 30 day trial edition of Dynamics 365.
All the code mentioned in the tutorial is available on my Github
Repo. All the customization used in the tutorial is found on releases
section of the same Github repo. I have tagged the binaries as pre-release
as I have not used the code in any production scenario. Although I am keeping
an eye out for any possible bug reported in Github or to my email but please
consider all the code as is. In the code I have integrated country Api found in
this
page along with the description of the each end point. A huge shout out to ApiLayer. A big thanks to Mark Findlater for
reviewing the blog.
Chapter 4
The last piece of the puzzle would be how to have dynamic API settings for different environments without changing anything in the code.
In Chapter 2 of our journey we added some custom fields in our Data Source, but we have not used them yet. Now since we have connectivity between the API and Dynamics and we can search in advanced find, let’s make the Data Source truly dynamic so that we can set all the API settings and configure them on a per instance basis.
Just to jog your memory our data source record now looks like below,

The Dynamics SDK provides an interface IEntityDataSourceRetrieverService that gives you access to the source of the Entity the Custom Provider that it is attached to. The retriever service is available within the service provider of the plugin.
First of all in my plugin code I add the following two lines,
I can then update my method that sets the settings for the api. It changes like below
So there you have it, we have created a Virtual Entity, Custom Provider, Data Source and then learned how to query and the configure the source so that we can have different API connections in our different instances. The code is available in this Github repo along with the solution. Have fun!
Virtual Entity : Chapter 3 – Translating an advanced find query to a query understood by the Data Source
Overview
This is of the four-part series tutorial where I am trying to explain virtual entity in Dynamics 365 CE. The chapters are,
- Chapter 1 - Core concept and definition
- Chapter 2 - Setting up custom data source and custom provider and hands on code
- Chapter 3 – Introducing searching capability (Current)
- Chapter 4 – Storing the settings for the api.
The demo is created on a 30 day trial edition of Dynamics 365. All the code mentioned in the tutorial is available on my Github Repo. All the customization used in the tutorial is found on releases section of the same Github repo. I have tagged the binaries as pre-release as I have not used the code in any production scenario. Although I am keeping an eye out for any possible bug reported in Github or to my email but please consider all the code as is. In the code I have integrated country Api found in this page along with the description of the each end point. A huge shout out to ApiLayer. A big thanks to Mark Findlater for reviewing the blog.
Chapter - 3
So now we have set up our Virtual Entity and it is connected to a Custom Data Provider. The Data Provider is getting data from third-party Data Source in an advanced find view. We can also open the record and see the details in a form.
Here are some problems that we have not yet discussed
- Can we run a query on the advanced find view so that only selected records are returned?
- What happens if we have different Dynamics instance (like dev-test-uat-production) and we have custom API environment for each? Do we need to register a Custom Provider like I did in Part 1 and Part 2 all over again for each environment?
This chapter will answer the first of the above questions. Ready?
Visitor Pattern and Query Expression Visitor
I am not going to go into huge detail about the visitor pattern. I found that this article explains the whole pattern very clearly. Let me, however, give you some idea of the problem we are trying to solve here, in our case we are exposing external data from and API. You might want to expose data directly from an SQL server or may be from even an azure logic app. So your users in CRM need be able to construct a query in Dynamics in fetch xml in advanced find. When the user clicks on search this comes to your retrieve multiple plugin. It becomes the responsibility of your plug in to translate the fetch xml (or query expression) to something that your data source can understand. This is where visitor pattern comes it. Newly introduced Query Expression Visitor class in the CRM SDK leverages this pattern to translate fetch queries to the query that the data source API will understand. The translation code still needs to be written by you. The pattern is there to encapsulate it. A similar example of this can be found in this MS doc I recommend reading and understanding the article in the first link for the explanation of the pattern before proceeding any further with this.
Code Example
So first up I am going introduce two new methods in my CountryGet class that will search countries by capital and search countries by region. They are quite self-explanatory. The former searches all the countries by given capital while the later searches country by region. After adding the code to call the apis my class for calling the API looks like below,
Now comes the visitor class – very straight forward nothing super crafty about it.
My Retrieve Multiple now ties everything up. Notice that I have also introduced tracing.
I have cleaned the code just to be very nit-picking, I introduced factory pattern in the country get like so,
For that my visitor is slightly changed as well.
And my Retrieve Multiple is a breeze
As you could rightly say by now formatting the query for a Custom Provider is not that hard, but it is a bit of work nonetheless. You should consider allowing support only for certain operator like I did on the code above. Like you should consider rejecting any queries that has date operator. The problem also become some order of magnitude harder when the user use combination of filter criteria.
You should also consider allowing search on the field that you support. In this way you can give searchability when it is relevant.

Virtual Entity : Chapter 2 – Create a Custom Data Provider for a Virtual Entity
Overview
This is of the four-part series tutorial where I am trying to explain virtual entity in Dynamics 365 CE. The chapters are,
- Chapter 1 - Core concept and definition
- Chapter 2 - Setting up custom data source and custom provider and hands on code (Current)
- Chapter 3 – Introducing searching capability
- Chapter 4 – Storing the settings for the api.
The demo is created on a 30 day trial edition of Dynamics 365. All the code mentioned in the tutorial is available on my Github Repo. All the customization used in the tutorial is found on releases section of the same Github repo. I have tagged the binaries as pre-release as I have not used the code in any production scenario. Although I am keeping an eye out for any possible bug reported in Github or to my email but please consider all the code as is. In the code I have integrated country Api found in this page along with the description of the each end point. A huge shout out to ApiLayer. A big thanks to Mark Findlater for reviewing the blog.
Chapter - 2
Recap and Some More Explanation
Following on from the definition page, in this chapter I would like to discuss how can we create and register a Custom Data Provider. Before that let me define a Custom Data Provider in more detail.
As discussed in the previous chapter that Dynamics 365 ships with an ODataProvider for Virtual Entities. If your API does not happen to support OData, you can create your own provider that reads, transforms and present the data to Dynamics. These are called Custom Data Providers.
What are the components of a Custom Data Provider? Excellent question! Under the hood Custom Data Providers are Pre-Operation plugins that have steps for Retrieve and Retrieve Multiple. Consider you are opening a first class Entity record in Dynamics CE. In order to find the record in question you send in the primary key to database via a Retrieve message. In the case of advanced find or looking for more than one records, you come up with a query and send query wrapped inside a Retrieve Multiple. Your Virtual Entities will follow exactly the same mechanism, the only difference here is that while doing the Retrieve or Retrieve Multiple call, you have code inside a plugin step that performs an API call to a third party datastore. Once the query returns you map it to your Virtual Entity and finish your plugin. It’s a very straight forward process, if you think about it. Makes you wonder why no one thought of it before!
Hands on Tutorial
Registration and configuration of Virtual Entity Data Provider requires a lot of back forth work between the plugin registration tool and Dynamics 365. Here are the rough steps that we need to follow in order to register a working Custom Data Provider.
- Step 1 : Create and register Retrieve and Retrieve Multiple plugin signature steps for Custom Provider. Although we cannot create a full working provider yet as the column definition of the Virtual Entity does not exist, this is where we start.
- Step 2 : Register the Custom Data Provider and Data Source with Plugin registration tool.
- Step 3 : Make additional configuration change for the source in Dynamics 365.
- Step 4 : Create the Virtual Entity in the Dynamics 365. Also create the columns in the Dynamics
- Step 5 : Finish the Custom Data Provider code and update the assembly in plugin registration tool.
First of all, Even before we begin, if you are using older version of the plugin registration tool, it will not work. It is crucial to have the latest version of the tool found on the Microsoft docs site. The one that comes with the SDK download did not work for me. I went to the above-mentioned site and ran the code in Powershell and after a while all the tools were installed in the stipulated directory.
Also all the code used in the following sections is
available for you in the Github repository. I have also included the Dynamics 365 with the code in the release section.
Step 1 : Creation and Registration of the plugin
This part is easy. I have created the shell of two plug in classes. One plugin is for Retrieve and the other for Retrieve Multiple. Apart from their names, they look identical.
We will have to register the plugin as normal assembly in the plugin registration tool. I am expecting the readers will have understanding of how to register a plugin. If this is something very new to you, please refer to this ms doc. It lists down every little detail for plugin registration.
Step 2 : Register Custom Data Provider and Data Source


Step 2 : Register Custom Data Provider and Data Source
Microsoft need to do a bit of work here (but stick with it!) Occasionally the plugin registration tool sometimes breaks even when the registration is successful! I have pointed out where it breaks and what to do when the registration tool crashes. The crashing was very frequent when I was trying custom provider couple of months ago. However, when at the time of writing this demo the registration tool has not crashed once. May be the trial instance that I was preparing this demo in has some updates that my organisation’s develop instance do not have. Refers to this document for more information for crash.
To register a new Custom Data Provider a click on Register button on the plugin registration tool again. And now select Register New Data Provider.

The below screen will be rendered. Complete all the fields (they are all mandatory)

My settings for Provider registration was as follows.
Settings Name
|
My Value
|
Explanation
|
Data Provider Name
|
Country Provider
|
Free text. Think of something that sensibly represents your Data Provider.
|
Solution
|
Look for the solution in question, My setting was Custom Provider
|
You can create your own solution in this screen but I prefer to create the solution beforehand.
|
Assembly
|
Codebug.CountryProvider
|
The newly registered assembly in the Step 1
|
Retrieve
|
The class in the above assembly meant to handle Retrieve message.
| |
Retrieve Multiple
|
The class in the above assembly meant to handle Retrieve Multiple message
|
I have skipped the settings while setting up data set registration. When you load the screen for the first time the look up will be blank and you can select the look up and can add a new entity in the following screen.

The new screen contains nothing but prompts for Name(s) of the data source entity and prompt for the solution where the user would like the data source entity to sit. Again, the names fields are free text and user can put anything sensible in the fields.
In most cases at this point you will be presented with an error when they click on create button. In addition to previous link that I shared on this topic it is explained beautifully in the following blog post. I am not going to bore you with details but long story short the data source entity has actually been got created. You only need to restart the plugin registration tool and go back to the Register New Data Provider screen again. This time you do not have to create a data source entity since you could see the data source entity in the drop down. You now just need to fill in the rest of the details.
Step 3 : Make Additional Change to the Data Source
I have discussed that the Data Source entity contains information about the source of the data rather than data itself. In the previous step we have created data source entity. We now need to make some additional customization in datasource in order to make everything work. These customizations will basically be new field creation. So that we can, for instance, store the main part of the url of the API that we are using. The API that we will be using using for this example uses a couple of set headers as well. We will create fields in the custom datasource so that we can store the keys and values for it. Last customization will be changing the form of the custom data source so that we can view the information. Let us go and do that.
Data source entity is created as a Virtual Entity in Dynamics meaning all the constraints for the Virtual Entity exists when you create a Data Source as well. When you create new field on the above Data Source entity you need to provide an external name as well. These external names for Custom Data Source fields do not have any usage but are required.
After the customization the Data Source Entity will be ready to use and you can set one up. You can view the data source by going to,
Setting > Administration > Virtual Entity Data Sources
Once there click on new button and select the Data Provider that you have registered with plugin registration tool. The record will look like below for our use case (I have added data to the page as well),

Step 4 : Create the Virtual Entity
I am planning to get country data from third party API. I have added the important information that I need in the previous screen shot. In case if you missed it the details can be found in the api description page. As you might have guessed, I am planning to expose list of countries in Dynamics through virtual entity. For the rest of the blog I am using two API end points,
- Get All countries – which will show all countries in an advanced find and in associated view
- Get by Country code – this will get a single country. This will be called when an entity form is opened.
- Search by Region – it will bring up all the countries in a region. I will use it to show advanced find capability.
- Search By Capital - another search functionality. This time with capital of a country.
The primary object (you guessed it right) is a country. Here’s how one object looks like on the API.

As you can see, the data structure is quite complex. I am going to normalize the object a little bit so that the deserialization becomes an easy task. One of the key things you might also have noticed is that this data structure does not give us an identifiable key. I am going to use Alpha3Code as the key and will hold a key-value dictionary inside the plugin which will give me a GUID when a code is supplied. I am sure you could think of ten other ways to craftily achieve the same thing! For this example, I consider having a dictionary inside the plugin code as simple enough. While we are on the topic, here’s how my model class look like inside the plug-in assembly,
Based on the above model I am going to create a new Entity, country as a Virtual Entity. My Entity definition looks like below.
Based on the above model I am going to create a new Entity, country as a Virtual Entity. My Entity definition looks like below.

For Custom Data Provider and Data Source External Name and External Collection name do not matter, the only requirement is they need to be populated. This is true for the external name for the field definition as well.

Step 5 : Finish the Plugin Provider Code
With Retrieve Multiple, you can do some nifty things with a visitor pattern to actually query for specific country. However, to keep the discussion on point, in this example, I am not including anything on that yet. So we will just be running a GET request and displaying the result in a Retrieve Multiple or a Retrieve step. The detailed code example is available on github.
Below is the class that is responsible for the api requests,
And below is how the plugins look like after we have done the code change
As mentioned before, RetrieveMultipleCountry is getting called when we are opening and advanced find view and trying to search for all country. RetrieveCountry will get called when user tries to open a single record. We are taking the entity id (Guid) translating it to 3 character country code, searching the country the code and then displaying the result in Dynamics.
On both the plugin you see we are initializing the countryGet object and below is the source code for it as it stands now,
There static settings for all the end points in an api. They are same for all the api endpoints used in a Dynamics 365 instance. However in a production scenario the likelihood is they won't be same for dev-test-production instance. We can configure this settings so that plugin code does not need to be changed every time you import the solution in a new instance. The current functionality mentioned above will soon change. In the following chapters we will look at how we can save the API specific information in secure way inside your Data Source.
As mentioned before, RetrieveMultipleCountry is getting called when we are opening and advanced find view and trying to search for all country. RetrieveCountry will get called when user tries to open a single record. We are taking the entity id (Guid) translating it to 3 character country code, searching the country the code and then displaying the result in Dynamics.
There static settings for all the end points in an api. They are same for all the api endpoints used in a Dynamics 365 instance. However in a production scenario the likelihood is they won't be same for dev-test-production instance. We can configure this settings so that plugin code does not need to be changed every time you import the solution in a new instance. The current functionality mentioned above will soon change. In the following chapters we will look at how we can save the API specific information in secure way inside your Data Source.
Up to now we have seen how to get all the records in an
advanced find. There is a way we can do queries that can bring up only selected
records. This will be discussed on the following chapter of this blog.
Hope you have enjoyed (even better understood..) what we
have discussed up to now. If you have any question, please do drop me line.
Virtual Entity : Chapter 1 – Definition and Usage
Overview
This is of the four-part series tutorial where I am trying to explain virtual entity in Dynamics 365 CE. The chapters are,
- Chapter 1 - Core concept and definition (Current)
- Chapter 2 - Setting up custom data source and custom provider and hands on code
- Chapter 3 – Introducing searching capability
- Chapter 4 – Storing the settings for the api.
The demo is created on a 30 day trial edition of Dynamics 365. All the code mentioned in the tutorial is available on my Github Repo. All the customization used in the tutorial is found on releases section of the same Github repo. I have tagged the binaries as pre-release as I have not used the code in any production scenario. Although I am keeping an eye out for any possible bug reported in Github or to my email but please consider all the code as is. In the code I have integrated country Api found in this page along with the description of the each end point. A huge shout out to ApiLayer. A big thanks to Mark Findlater for reviewing the blog.
Chapter 1
Virtual Entities have been available for quite some time now and although I knew conceptually what they were I had not had a chance to use them. Recently I had to look at them for a project at work and I was a bit surprised to find that there aren’t many blogs about them. I will rectify that.
In the first part of the blog, I will start by defining various components of the virtual entity stack. I will then follow up the core concepts with some actual real-life examples. I will include links to a code repository and a packaged solution that could be imported into Dynamics 365 to see the inner workings in action.
What is a Virtual Entity?
The actual definition of a Virtual Entity can be found in this MS document. My own definition of it is not very different. However, before starting to define it in my own terms, let me give you common case study:
Dave the developer, comes to the office one morning. Before going to his desk, he makes himself the best mug of coffee. He is thrilled about the promise of the day. Today he is going to finish the project that he started few weeks ago but never got around to finishing. He even charged his noise cancelling headphone to max so that he can exclude himself from all the usual distractions of the office. Alas the solace never lasts that long, in comes the project manager.PM : Hey Dave, I have this ultra-super max priority work that I need you look at atm.Dave : Err… did you not want me to finish this work that I started looking at couple of days ago.PM : Yeah! But this work is even a bigger priority.Dave : Huh! Okay, so what’s the work?PM : Management wants to show a list of ingredients for cakes in the brand new cake web side.Dave : But the ingredients database in not in Dynamics 365.PM : Okay, can you not import the data in to Dynamics?Dave : Of course I can. I can create an ingredients table in Dynamics and create a SSIS package to import the data from the ingredients database into Dynamics.PM : Oh I forgot, as you know ingredient changes all the time for cakes. So we need the data to be always updated.Dave : Okay, I can run the SSIS package every 5 mins and scan for updated, newly created ingredients and update Dynamics 365 with the data. But for that we need an SQL database server to run the SSIS package in timely manner. You can also do it in azure but it is not free.PM : Oh I forgot, since they are now going through this security stuff now, the ingredients organization will not permit us to use their database directly. They are creating this API and we can only get data from the API.Dave : Okay, SSIS will not be a wise idea then. Maybe Azure Data Factory or Azure Logic Apps then?PM : Erm one tiny problem. We do not have money to have either and management wants this done tomorrow.Dave gets up bashes his head against the wall.
Except for the extremities, above is a classic example for a
data migration/integration project. Even if you take the complexity and
technology out of the equation you still need to answer questions like How
often do you keep the data updated? What happens if an update sequence fails?
It all boils down to the fact that maintaining one source of truth is far
better than maintaining multiple sources. If you want to consider a single
source of truth as a rule of thumb for your project, then all you have to
answer is how do you present the data with possibly limited customization.
Virtual Entities answer the above question with relative
ease. My definition of a Virtual Entity is as follows:
A Virtual Entity is a process by which Dynamics 365 can present data located in a third-party data store to the Dynamics’ application users. This means with a Virtual Entity the data remains in its original location but gets a 'view' inside Dynamics 365. Since the data is not getting copied over there is no need to run expensive integration that synchronizes data. With certain limitations the data is query-able through advanced find, through SDK calls and meta data calls. However, the data remains in a read only state while using virtual entity through Dynamics 365.
Components
There are three major components of Virtual
Entities.
Data Source
From a high-level point of view data source
denotes the source of data. However, for Dynamics 365 a Data Source is
basically the information about the source of the data. Such information might
include, for OData service, the base url, query string, api header. For a
custom provider it may include the column set, connection string etc.
Interestingly you cannot create a data source from within a solution. You can
only add an existing data source. A Data Source can be created by going to
Settings > Administration > Virtual Entity Data Sources. Once the Data
Source is created in can be added to a solution and exported to different instances.
Data Provider
This is defined as the component the connects
to a Data Source, fetches the data, transforms the data and supplies it to
Dynamics. By default, Dynamics 365 ships with ODataProvider. There is a Cosmos
Data Provider that is available on the Microsoft App Source which I have not tested. Developers can also create custom Data Providers of
their own. Regardless of the provider, the data that gets presented to the
Dynamics needs to have a key field and key needs to have a globally unique Id.
If you are working on a non OData API and need to give a user access to any
data using a Virtual Entity, an option can be to use Custom Data Provider as a
transformation layer and add a Guid column on each row.
Virtual Entity
A Virtual entity is the record type that has
the same columns as those that come from the Data Provider. A Dynamics user can
flag an Entity to be a Virtxual Entity when they are creating an Entity in
customization. For a Virtual Entity that depends on an out of the box
OdataProvider by Microsoft, mapping for entity name, fields and data type are
very strict. I am going to discuss custom data provider in following chapters. For custom
data provider some of the rules does not apply. Refer to this document for more information know how on OOB odata provider.
Sunday, 9 April 2017
New things on Dynamics 365 - Workflow Steps
Microsoft has totally revamped the Add Step button menu while writing a workflow. I haven't used most of the new functionality yet but here's some of the cool stuff.

Perform Action
Perform action gives you access to all the actions in the system. When I say all the actions - i mean all the actions (depending on your access privilige ofcourse) including the system ones, Like below I am running Qualify Lead action on a lead.

I suppose the other section that i marked in the Add Step menu are the custom workflows but I am not sure yet.
More on actions can be found in this link from msdn.
Perform Action
Perform action gives you access to all the actions in the system. When I say all the actions - i mean all the actions (depending on your access privilige ofcourse) including the system ones, Like below I am running Qualify Lead action on a lead.
I suppose the other section that i marked in the Add Step menu are the custom workflows but I am not sure yet.
More on actions can be found in this link from msdn.
Subscribe to:
Posts (Atom)